8 Ways to Use a Wedding Vendor Manager to Keep Track of the Pros You Hire

One of the biggest milestones of the wedding planning process is hiring your vendor team. Once you've booked your wedding vendors, it might feel like your work is done and the pros will take it from there. While that's somewhat true, you'll still need to stay organized, which is where these wedding vendor manager tools and tips can help you stay on track in the months leading up to your big day. According to The Knot 2023 Real Weddings Study, the average couple hires 14 wedding vendors, which adds up to a lot of different payment schedules, meetings, contracts, emails and more. We're explaining how to keep track of wedding vendors using your account on The Knot to store all of the important info in one easy-to-access place.
In this article:
How to Keep Track of Wedding Vendors
It's no secret that planning a wedding takes a lot of work, and a big chunk of that effort goes into simply managing all of your vendors and keeping track of important info. Here are a few tips on how to keep up with wedding vendors to make the process a little easier.
1. Hire a wedding planner.
A wedding planner's job isn't just to make your wedding look incredible—they put in a ton of logistical work behind the scenes, too. That includes managing and keeping track of your wedding vendors, not to mention helping you build the perfect team of pros in the first place. With the help of a wedding planner, you won't have to worry as much about fielding questions from wedding vendors or keeping track of decisions and conversations that took place. If you're using The Knot Vendor Marketplace to hire some of your vendors (including a wedding planner), you can create a shortlist of your favorites by category using The Knot Vendor Manager and mark them as 'booked' once they're officially hired.
2. Use The Knot wedding binder.
If you prefer old-fashioned paper and pen, you'll love using The Knot Wedding Binder as your wedding vendor manager. We designed this binder to include everything you need for the vendor hiring process, including wedding vendor checklists, a timeline of when to hire wedding vendors, questions to ask potential vendors by category, space to write vendor deadlines and due dates, and a built-in folder to hold hard copies of important documents.
3. Create a wedding planning spreadsheet.
Spreadsheets for work? Meh. Spreadsheets for wedding planning? Much more exciting. A wedding planning spreadsheet will help you see everything at a glance, especially when it comes to tracking vendor payments, contact information and payment status (first deposit paid, paid in full, etc.). We created an all-in-one spreadsheet to help make wedding vendor management—and other important wedding to-dos—easy and organized.
4. Organize everyone's contact information.
You'll want to have your vendors' contact information easily accessible—in particular, your pros' business name, address, email and phone number (The Knot's tool uploads this info automatically when you sync your vendors through The Knot Vendor Marketplace). If you're working with a larger company, like a wedding venue or a caterer with multiple employees, you'll want to include the name of the person you're working with. It's also important to include each vendor's preferred form of communication—maybe your wedding planner likes to text, while your florist prefers email. As you near your wedding date, you'll want to share each vendor's contact information among the rest of the vendor team so everyone can coordinate and stay in touch on the big day. Your wedding party and close family members should also have access to your pros' contact info in case of an emergency.
5. Streamline your communication.
From your first outreach to the final details, you're going to be talking to your wedding vendor a lot. And you'll likely refer back to those conversations a lot during the planning process ("What color are our table linens again?" "How many tiers is the wedding cake?"). That's why it's a good idea to keep all of your wedding vendor communication in one place. The Knot has its own Vendor Inbox so you don't have to search through your already-crowded email inbox to find wedding-related conversations.
6. Make a designated place for vendor contracts.
Reading through vendor contracts isn't the most fun part of wedding planning, but it's a super-important one. Proposals and contracts have a lot of valuable information, including pricing and package details that you'll want to have close by. Even after the contracts have been finalized and signed, we recommend storing all of the documents in a shared digital or hard-copy folder that's easily accessible in case you have questions or concerns.
7. Track your payment schedule with a budget tool.
As you approach your wedding day, vendor payments will become due—and different pros have different payment plans and schedules you'll need to keep track of. Fortunately, The Knot Vendor Manager syncs with your The Knot Budgeter to make sure you stay on top of those payments. However, we also recommend creating calendar invitations to keep track of those due dates—most vendors require full payment about 30 days before your wedding date, but that depends (so be sure to read those contracts carefully). And don't forget about tipping your wedding vendors or adding gratuity as part of your payment schedule.
8. Make a shared appointment calendar.
You'll likely meet with all of your wedding vendors at some point in the months leading up to your event, but different vendors have different meeting schedules and needs. You may meet with your officiant on a weekly basis for premarital counseling or talk to your wedding coordinator almost daily, but just meet with your videographer once or twice. And catering and cake tastings, hair and makeup trials and other meetings definitely need to be scheduled. Make sure to put all meetings on a shared calendar with your partner so you both can attend, whether it's in person or via video chat.
How to Use The Knot Vendor Manager
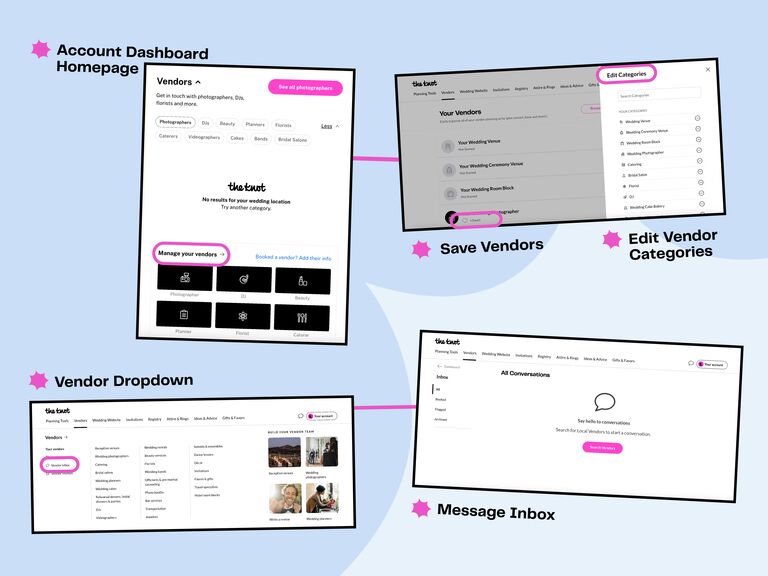
Keep this step-by-step list handy when you're adding, customizing and editing your vendor information using The Knot Vendor Manager tool on desktop or communicating with your vendors through The Knot App.

- Make your account on The Knot to access the Vendor Manager tool from your account dashboard.
- From the dashboard, scroll halfway down the page until you see "Manage your vendors." Click on a vendor category to browse vendors, save vendors you like and request quotes.
- To save a vendor for later, click the heart icon in the upper right corner of the vendor's thumbnail photo or next to their name on their vendor Storefront page. You can access your saved vendors by returning to the "Manage your vendors" section on the dashboard.
- To add a vendor you've already hired, click the link in the Vendor Manager tool that says, "Booked a vendor? Add their info." You'll be prompted to select the vendor category from a dropdown list and type the vendor's name to pull in their profile from The Knot Vendor Marketplace, Google search results or create a custom profile.
- To delete a vendor from your list, go to "Manage your vendors" and click on the name of the vendor you want to remove. Once you're on the message page for that vendor, click their thumbnail photo. In the right sidebar that opens, click the trash can icon next to the vendor's name.
- To edit the vendor categories, click "Manage your vendors" from the dashboard, then the "Edit Categories" button in the upper right hand corner. You'll be able to add or remove vendor categories according to your needs.
- To send a message to a vendor, click the speech bubble icon in the upper right hand corner of your account dashboard or select "Vendor inbox" from the dropdown menu at the top of the page.
Samantha Iacia contributed to the reporting of this article.


