


Venus Williams is in love (no, not that kind). In her first joint print interview with husband Andrea Preti, the newlyweds open up about their multiple weddings, the moments that mattered most and what greatness means in marriage.
Updated Apr 28, 2026Everything You Need to Know About Wedding Hair and Makeup Trials
Beauty experts give tips on how you can make the most of this service.
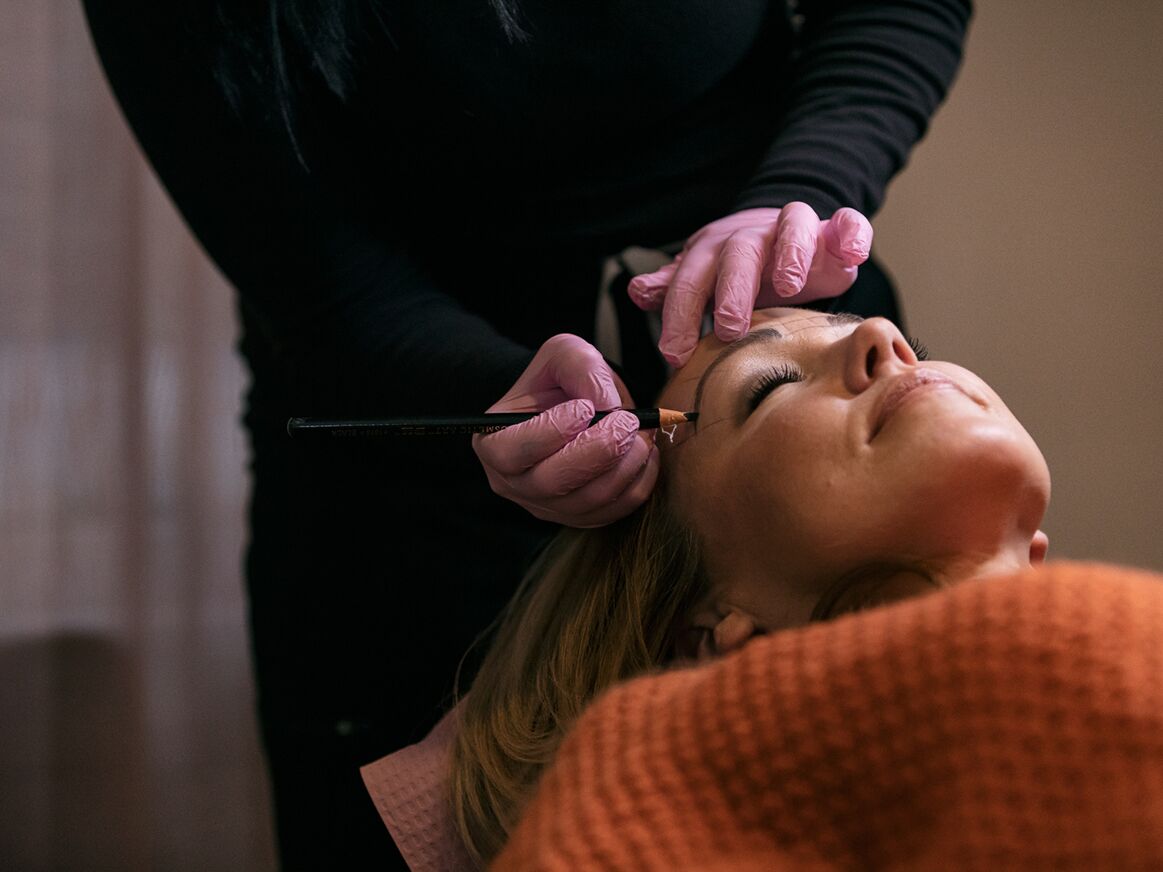
The best wedding glam involves more than just getting done up on the big day. A hair and makeup trial, while not required, is highly recommended by experts and former brides alike. Trying out the beauty look you want before the wedding is the best way to ensure you'll love the end results—after all, no one wants to feel blindsided or disappointed about their hair or makeup on their wedding day. Working out any kinks or issues well before the ceremony and professional photos will help you get a look you love while also making you feel more confident and a little less stressed.
Of course, another important part of the hair and makeup preparation process is to hire a hairstylist or makeup artist who has done work you genuinely love—and who doubles as someone you trust and feel comfortable with. If you're struggling to find a hairstylist or makeup artist, use The Knot Vendor Marketplace to find someone in your area.
In this article: What Is a Hair & Makeup Trial? | Cost | Scheduling | Preparation | Next Steps
What Is a Wedding Hair and Makeup Trial?
Wedding hair and makeup trials occur in the weeks or months leading up to your wedding, and give you the chance to test out the beauty look you want to make sure you really love it. "A hair and makeup trial is essentially a rehearsal for your bridal beauty look," explains Taylor Carter, owner of East West Salon Co., located in Boston and Easton, Massachusetts. "This helps ensure everything turns out exactly as you envision it and also gives you a chance to make adjustments ahead of time."
FEATURED VIDEO FROM THE KNOT
During a trial, you'll meet with the wedding makeup artist and wedding hairstylist you've hired. If you already know exactly what look you want, you can discuss that with them, show them inspiration photos, and see how they bring it to life. If you have no idea what you want, a trial is a great time to talk over some ideas with them and get their insight and opinions before testing something out.
Do I need a hair and makeup trial before my wedding?
Hair and makeup trials are almost never required in order to hire a hairstylist or makeup artist. There's no rule saying a bride must do a trial, but many experts do highly recommend doing one. "I think they're totally essential," says Crystal Coisne, bridal hair and makeup artist at Love Lane Salon in Jersey City, New Jersey. "Not only are you testing out different hair and makeup looks you've never done before, but you're testing out the chemistry between you and your artist. You are building trust and making sure the artist can execute your vision for your wedding day glam, that way there are no surprises day of, and you can have peace of mind that your look is in good hands."
A wedding hair trial is a great opportunity for your stylist to get to know details like your hair type and exactly what your gown is going to look like. It gives them the chance to recommend wedding hairstyles that will work best with your overall vibe and aesthetic. At a wedding makeup trial, you have the opportunity to try new products or techniques you may have never tried before, like airbrush makeup, to see if you like it.
That said, hair and makeup trials do cost extra money, so if they're not in the budget, it's not the end of the world. If that's the case, make sure you're hiring an artist you're familiar with. "I think if you know your makeup artist or hairdresser and you trust their aesthetic, then a trial isn't necessary," says Pilar DeMann, beauty specialist and brow expert located in Washington, Connecticut. However, if you've never worked with the artist before, or you are very particular about your beauty look and want something extremely specific, DeMann notes that a bridal trial is a good idea to ensure everyone is on the same page.

Design: Falak Khoja
How Much Does a Wedding Hair and Makeup Trial Cost?
Remember: The costs of bridal hair and makeup trials are almost never included in the price you pay for your wedding day glam. It's almost always an extra cost (unless they are offering some sort of package fee), and the price can vary widely depending on your location, the expertise of your makeup artist or hairstylist and what you're getting done.
In general, Carter says, an individual hair or makeup trial will cost about $75 to $200 each, while combined hair and makeup trials may cost anywhere from $150 to more than $400. Be sure to factor this price into your overall wedding budget.
According to DeMann, many makeup artists and hairstylists charge a bride or bridal party more than if you went in asking for evening or basic makeup, simply because it's wedding-related. However, it may not be quite as much as what you're paying for the wedding day. "These places generally charge less for the trial but more for the wedding day," she notes. The cost of wedding hair and makeup can vary depending on a variety of factors, but typically ranges between $150 and $400 per service.
Do you tip for a hair and makeup trial?
You probably already know that you should tip your wedding vendors on the big day. Should you also add a separate tip to your makeup artist and hairstylist after a trial? According to all three beauty experts we spoke to, a tip is never expected, but always appreciated. "Artists who work for a salon or organization are giving a percentage of their fee to their employer," DeMann explains. "Tips go directly to the artist. For artists who have their own studio, a tip just says, 'thank you.'" A good rule of thumb is to tip between 15% and 20% of the overall fee.
When to Book Hair and Makeup Trial for Wedding?
There's no specific rule on when to book your hair and makeup trial; however, both Coisne and Carter recommend scheduling them one to three months before your wedding day. "That's close enough to reflect your final hair length, season and overall vision, but early enough to make changes or book a second trial if needed," Coisne says.
Just remember to schedule your wedding hair and makeup trial far in advance so you get the date you want. Carter recommends booking six to 12 months in advance, depending on the demand for the artists and dates. Keep in mind that if you're booking a trial during peak wedding season, the makeup artist or hairstylist may say they can only do trials on weekdays—this leaves their weekends free for weddings.
FOR YOU
How Much Does Microblading Cost and Is It Worth It?
Experts fill us in on how much you’ll pay for microblading, as well as what to know before you schedule a pre-wedding session.

Why We Don't Believe in the Wedding Diet
Bombarded by weight-loss messages before the wedding, couples are facing a mess of 'perfect proportions' while planning. We explore why.
Here's What Your Wedding Dreams Really Mean
A dream analyst and a psychologist break down what your wedding dreams are really about.
When it comes to scheduling, you also want to think about what you're testing during the trial. This is especially true if you plan on having the stylist use hair extensions. You'll want to think about how long hair extensions last so that you have enough time to see how they feel and wear over time. This can vary depending on the type of extensions you're using—for example, clip-ins can be removed and reused daily, while tape-ins or bonded extensions can last four to eight weeks with proper care. "If you want to wear them for prewedding events and the wedding itself, plan your trial within a week or two of the event or the big day; this way, your hair looks fresh and styled consistently," Carter says.
Lastly, think about whether you want your hair and makeup trials done on the same day or separate days. "It's perfectly fine to schedule your hair and makeup trials on separate days, especially if you're hiring artists from different businesses," Coisne says. "However, it would be ideal to schedule both for the same day so you get the full vision." Note that if you're using artists from different businesses, it may be tricky to schedule them on the same day.
How long does a hair and makeup trial last?
Your hair and makeup trials can go on for one to three hours each, depending on what you're getting done and the expertise of your artist. Be sure to schedule your trial during the day or night when you have plenty of time to devote to it—you don't want to be in a rush to get somewhere else, since that can end up affecting the trial and outcome.

Design: Falak Khoja
How to Prepare for a Bridal Hair and Makeup Trial
One of the worst things you can do is go into your hair and makeup trial without any preparation whatsoever. You won't get the most for your money if you don't invest a little time and effort into getting ready beforehand.
Do Skincare Prep
Before your bridal makeup trial, you should have your skin looking its best. This might mean something as extravagant as getting a facial or doing dermaplaning, or something as simple as wearing a mask before you arrive. "Clean, well-moisturized skin is best for a trial," DeMann says. She also recommends that any laser treatments, facials or tanning should be done a week prior to give your skin the chance to calm down. If you know you're going to get a spray tan for the wedding, it's a good idea to also get one before the makeup trial, since this change in skin color can dictate a change in makeup products as well.
Arrive With Hair Ready to Go
Your hairstylist will more than likely let you know how to have your hair when you arrive for a trial. If they don't, though, you can always feel free to ask. And keep in mind that the general rule is to have clean, dry hair. "No oils, no heat styling it yourself, no products in the hair," Coisne says. "We want the canvas that is your hair to be as clean as possible to be able to replicate what will be done on the day of your wedding." That also means no wet hair—unless you've paid a separate fee, your hairstylist is not going to be washing or doing a blowout.
Put Thought Into What You're Wearing
It's not a good idea to arrive at a hair or makeup trial in your wedding gown, but you can wear something similar, especially for a hair trial. Think about the neckline of your wedding dress and try to mimic that—this allows your hairstylist to think of hairstyles by neckline so they can pick something that really complements your gown. You should also consider what you're doing after the trial. "If you're planning to go out or be photographed after, wear something you can unbutton instead of something that you pull over your head," DeMann says. She also recommends wearing white or off-white so you can get a better idea of how your makeup will look with your dress.
Bring the Right Items
You should never show up to a hair or makeup trial empty-handed. "Bringing the right items can help the stylist create a cohesive, personalized look and ensure everything works together on the big day," Carter says.
- Inspo photos: Save photos of the hair and makeup looks you like the most to show your artist. In the weeks leading up to the hair and makeup trials for your wedding, spend time researching current bridal hairstyles and wedding makeup ideas to find looks that you love. You can also bring photos of yourself—Coisne recommends coming with photos of makeup on you that you've loved in the past. If you want to show them what to avoid, she notes that you can also bring photos of yourself with makeup you don't love.
- Makeup products you want to use: For your makeup trial, be sure to bring any wedding makeup products you know you definitely want to use on your big day. "Maybe you already own the perfect lipstick you want for your wedding day," Coisne notes, recommending to bring that along. Since makeup artists don't always provide false lashes (they may also charge an extra fee for them), buy your own and bring those to the trial, too.
- Hair products you need: For a hair trial, it's essential to bring the bridal hair accessories you want to wear on the day of so that your stylist can incorporate them into your look. If you're planning to wear your wedding hair with a veil, bring your veil. If you want to wear wedding hair extensions, make sure those come along with you as well, or have them already placed in your hair.
- Photos of your dress: Your hairstylist (and probably your makeup artist) will almost definitely ask what your dress looks like. Be prepared with photos of your dress that show all the details and the color clearly.
Have a Close Companion With You
If possible, always bring a trusted friend or family member with you—think your maid of honor, best friend, mom or sister. They can offer their honest opinion to help you make important decisions. Just don't bring a crowd—too many opinions and people can feel overwhelming.
Consider Booking Extra Time
In most cases, a hair or makeup trial covers just enough time to try one look. If you want to try multiple looks, Carter recommends booking extra time for the trial. Note that this will probably cost more, but it can be worth it if you're feeling very undecided.
What to Do After Your Hair and Makeup Trial
Your hair and makeup trials are a great time to see the look you've been dreaming about come to life. Be sure to take advantage of that afterward and try out the following tips.
Take Photos
Take lots of pictures immediately after your wedding hair and makeup trials. You can usually ask your hairstylist and makeup artist to help with this, or you can enlist the help of a friend or take them yourself. Pictures give you the best idea of what your makeup and hair will look like in professional photos on the day of your wedding, since looks can sometimes come across differently on camera. Coisne also recommends wearing the trial look for a few hours and then taking photos (to see how the hair or makeup does over time) and taking photos in different lighting situations.
Ask for Opinions
Take some of those photos of your completed looks and send them to a few trusted friends and family members. Try to limit this to just one to three people so you don't get overwhelmed by opinions. This is especially helpful if you went to the trial on your own. "You can even FaceTime a friend to get some different perspectives and so they can see how the look is with movement," Coisne says.
Offer Feedback
Think about what you liked and didn't like about your hair and makeup, and then feel free to bring these things up to the hairstylist or makeup artist. "Trust your gut—if something doesn't feel right, it's okay to ask your artist for tweaks or any big changes," Coisne says.
Think About How You Feel About the Look
Don't only rely on what your friends and family think—it's crucial to consider how you feel as well. "Some brides want a transformation, some brides want to look like themselves, just better," DeMann says. "Your makeup will reflect you, and on your special day, it's essential to feel your best. If you aren't happy with the trial, maybe you need a different artist or a different direction." Take notes if you want to remember your thoughts and keep researching other looks if you aren't thrilled.
Do Something Extra Special
Take advantage of the professional hair and makeup service you just paid for and do something special after your trial. For example, Carter recommends scheduling your dress fitting after a trial to see the look in full effect. A lot of brides choose to schedule their trial before an engagement photo session, bridal shower or bachelorette party. If you have nothing big to do afterwards, simply go out for a special dinner with your fiancé or friends.


