


Spice things up with these steamy flicks.
Updated Oct 14, 202423 Gorgeous Wedding Saris From Real Weddings You'll Love
We're obsessed with these celebratory South Asian dresses.
Wedding saris are traditional garments worn for Indian weddings and other special occasions in Hindu, Punjabi and Bengali cultures. Also commonly spelled saree, this South Asian wedding dress is named after the Sanskrit word for "strip of cloth." Wedding sarees are made in hundreds of different designs, colors and fabrics, so we understand how hard it may be to narrow down which ones you (or your bridesmaids) should wear on your special day. But don't stress—we've gathered 23 of our favorite looks from real weddings to help influence your future wedding day outfit. And we guarantee there are options for every type of bride, from the traditional to the unconventional.
And, fun fact: There are countless depictions of Hindu goddesses wearing saris—so wear that sari like the queen you are.
White Saree Ideas for the Bride
Combine Western and Eastern wedding traditions by wearing a white saree as your wedding day outfit. Check out these beautiful white and off-white sarees worn by real brides.
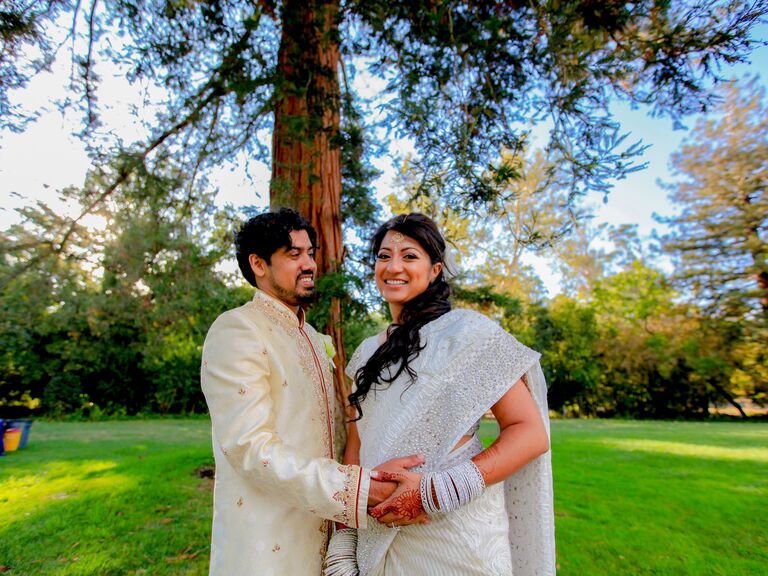
Intricate White Bridal Saree
At this Indian fusion wedding, the bride wanted to incorporate her and her partner's heritage into the wedding without ignoring their American upbringing. This white saree speaks to the bride's wishes. The intricate beading and embroidery match perfectly with the bride's silver bangles.
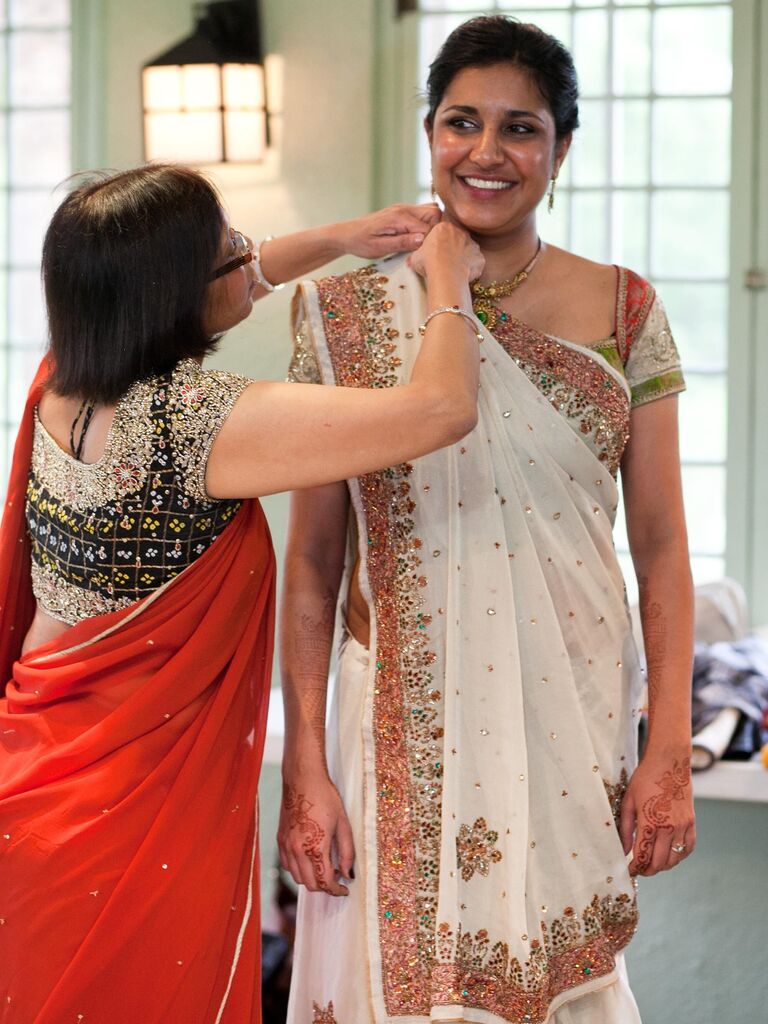
Bejeweled White Wedding Saree
A lightweight white wedding saree like the one above is a good option for brides planning weddings during the warmer months. And if you want to wear a white saree with hints of color, get inspiration from this bride's saree with gold, red and green jewels added to give pops of color to the wedding look.
Gold and White Saree for Wedding
For the Hindu ceremony, the bride wore a unique white and gold saree she got in her family's hometown in India. To honor your or your partner's background, consider purchasing your wedding sari from your family's home country.
FEATURED VIDEO FROM THE KNOT
Elegant Red and White Indian Wedding Sari
This gorgeous off-white Indian wedding sari matches the couple's wedding color palette of saturated reds, pastel salmon and gold. Consider getting a wedding sari that complements your wedding color scheme.
Colored Sari Ideas for the Bride
If you prefer vibrant, alternative or traditional wedding sari colors, we've got you covered. Here are more options for brides in search of bridal sari inspo.
Traditional Gold and Red Bridal Saree
Red and gold are colors commonly seen on wedding sarees. Some believe the reasoning is that red is connected to the Hindu goddess, Durga, who symbolizes strength and power. In religious depictions, rich red and gold colors are always worn by Durga.
Lace Yellow Indian Wedding Saree

Photo: Arising Images
,Blue Peacock Boutique
We love this unique pale yellow wedding saree this bride wore to her ceremony. She later changed into a Western-style white wedding gown for the reception. If you can add it to your wedding budget, consider having two wedding day looks so you can represent your different cultural backgrounds.
Green and Fuchsia Wedding Sari
The bride is wearing a beautiful green, fuchsia and gold sari. Her bridesmaids don custom-made Indian ceremony outfits with the same color palette and matching floral designs. These bridesmaids' dresses are a perfect complement to the bride's attire.
Peach Saree for a Wedding
At this peach and green wedding, the couple wore wedding outfits that matched their wedding color palette. The bride's gold wedding jewelry is a great accent to the gorgeous peach-colored saree.
Bold Orange and White Saree Wedding Dress
The brides decided to wear two different dresses for their wedding ceremony. One bride wore a traditional saree with heirloom jewelry from her grandmother as a meaningful nod to her family and their acceptance of her and her partner's relationship.
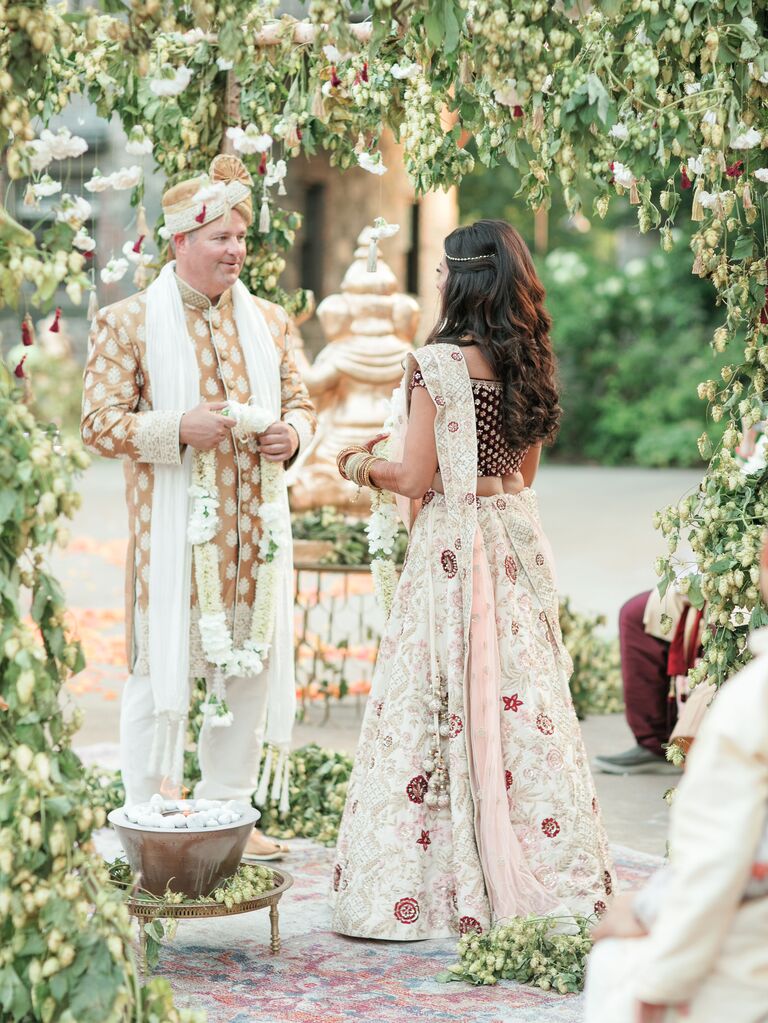
Floral Patterned Gold Sari With Red Veil
This is a different take on the traditional red and gold sari since the entire sari is pale gold. The bride wanted to show her appreciation for her husband's Indian culture, so she asked for his family's help to find this stunning wedding sari. If you don't know where to go bridal sari shopping, think about asking your family or your partner's family for suggestions.
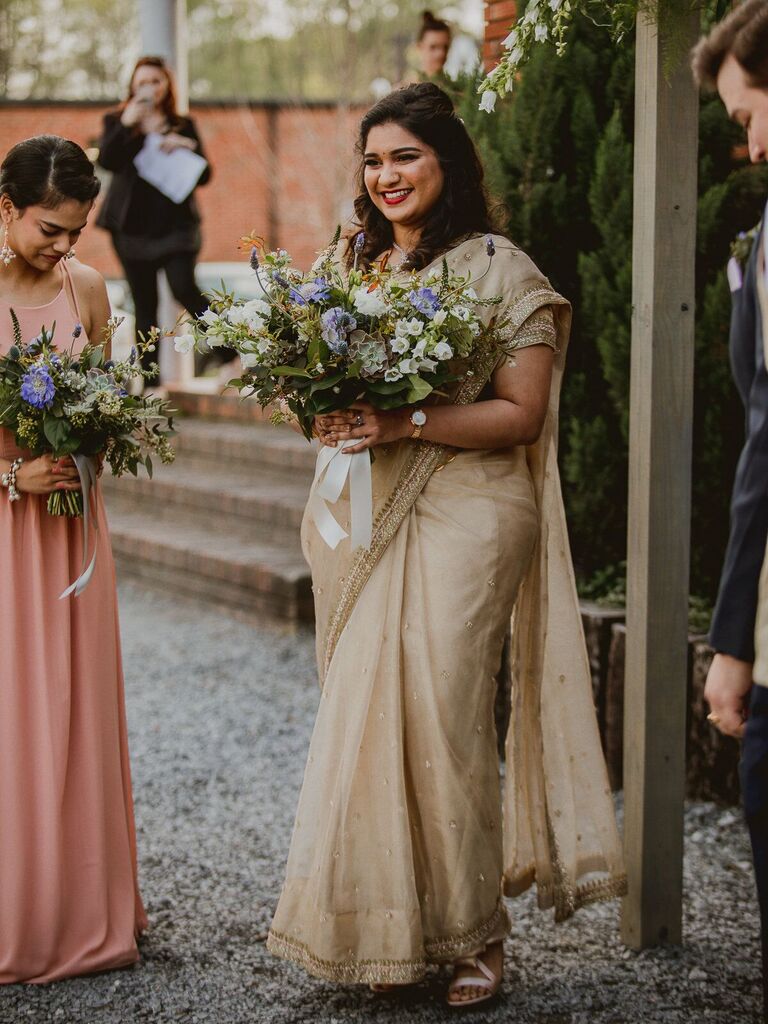
Neutral-Toned Wedding Sari
Want your wedding sari to go with your earth or neutral-toned wedding? Choose a cream brown color for your sari like this bride did for her modern and casual wedding.
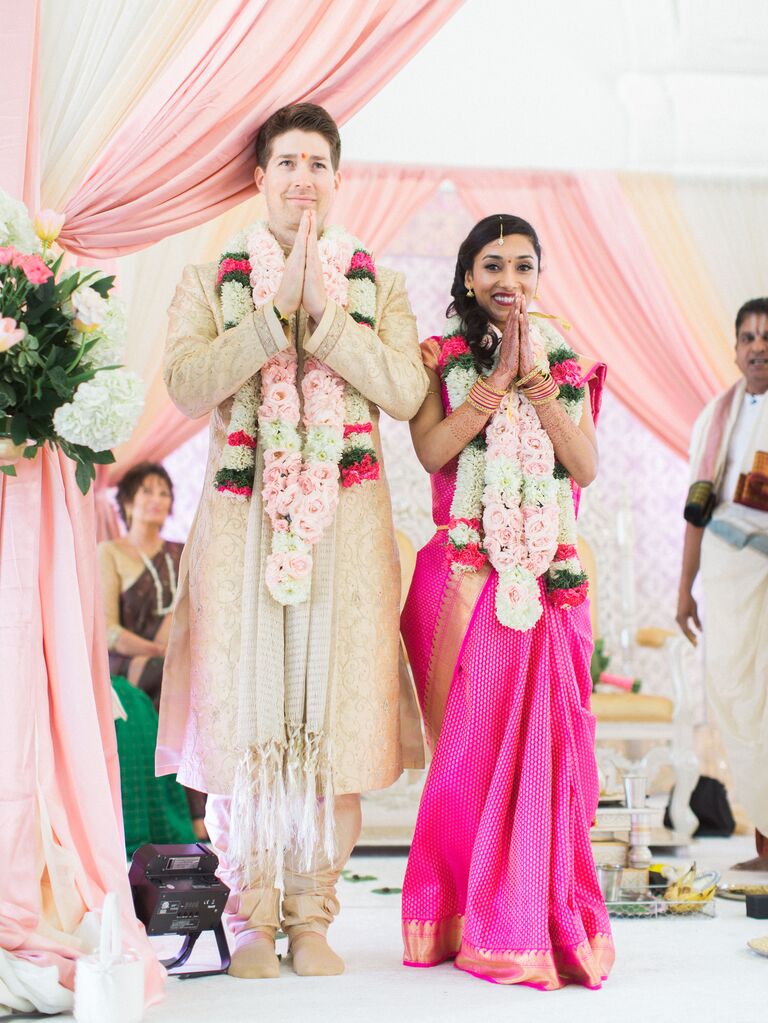
Bright Pink Wedding Saree
The couple wanted to put a modern twist on the traditional red used in Hindu weddings by incorporating pink and other muted colors. They also wanted their outfits to be center stage, so the bride wore a bright pink and gold silk saree.
Wedding Sari Ideas for the Bridesmaids
If you need wedding ensemble ideas for your crew, check out these unique saris that'll look great on your VIPs and in wedding photos. And don't hesitate to use these bridesmaid sari colors and designs for your wedding dress too.
FOR YOU
The Best Spring Engagement Photo Outfits for 2024
Let the season inspire your looks.

Preview Spring 2027 Justin Alexander Wedding Dresses
Including a debut label with gowns inspired by Shakespearean poetry.

See the Latest Pnina Tornai Wedding Dress Collection
Plus, she gave The Knot an exclusive teaser for her next big project: a new reality TV show.
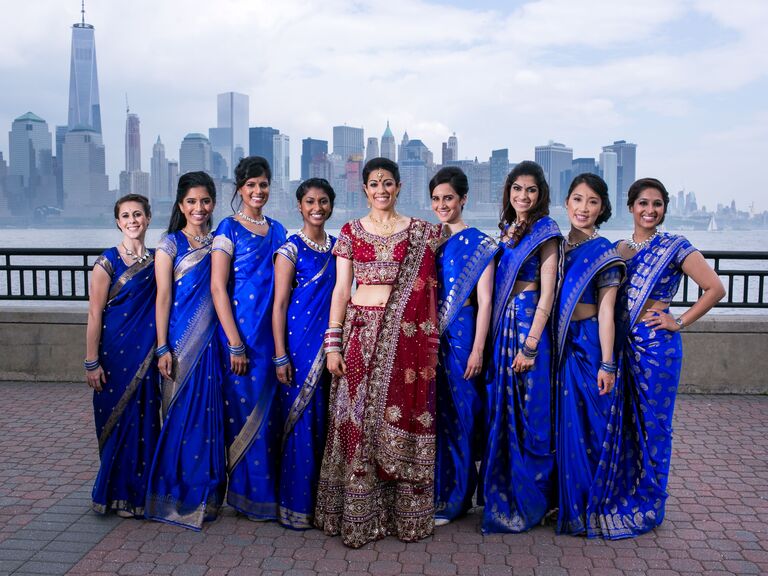
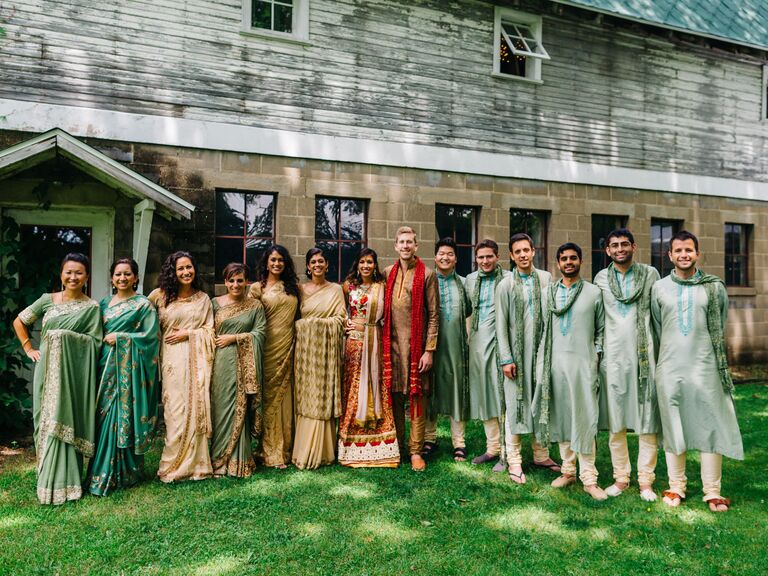
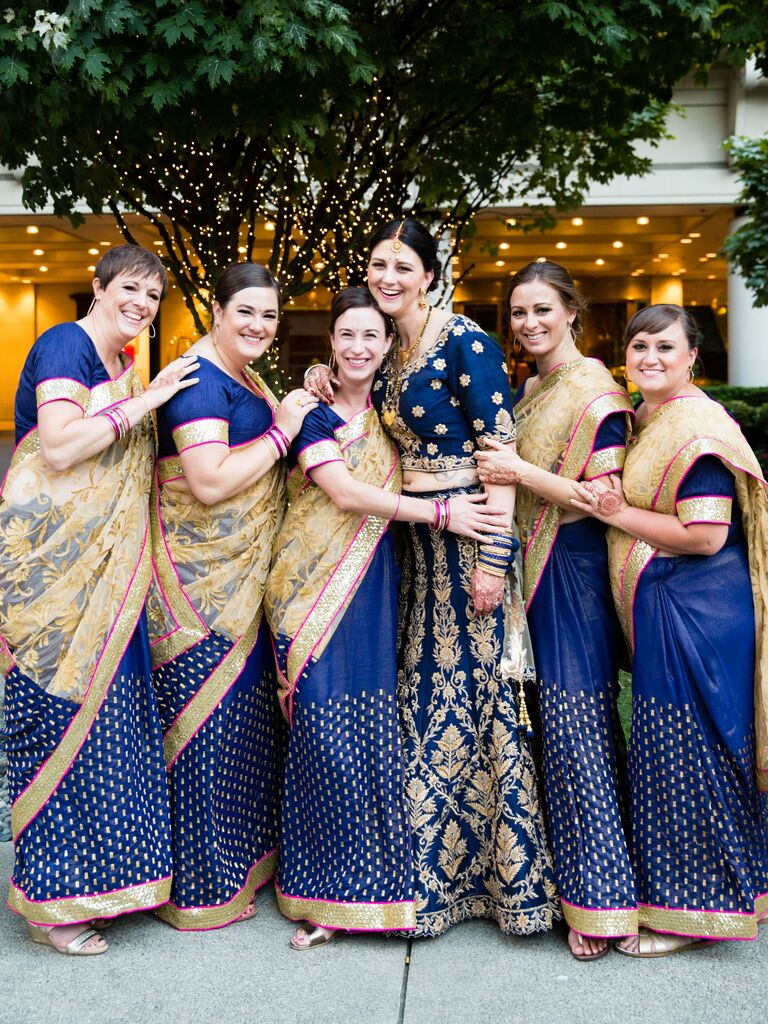
Bridesmaids in Royal Blue Wedding Sarees
At this traditional Indian wedding, the bridesmaids had unconventional wedding day looks. Each bridesmaid wore a vibrant royal blue saree with different gold details, which gave the bridesmaids a sense of individuality.
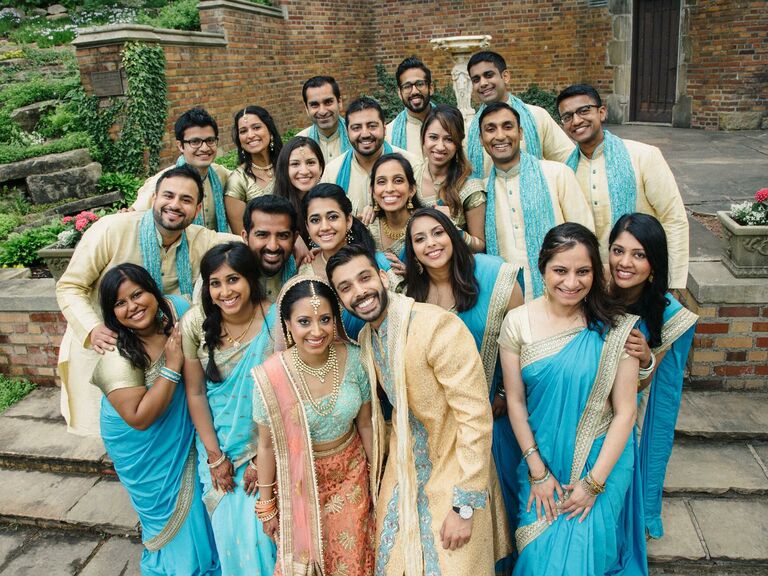
Turquoise and Gold Bridal Party Wedding Saris
Each bridesmaid wore an elegant turquoise wedding sari with gold trim. To the bride's left, is the bride's sister, who's wearing a similar sari as the rest of the wedding party, but it has gold details throughout. This is a good idea for couples who want to have their honor attendant or family members stand out in wedding photos.
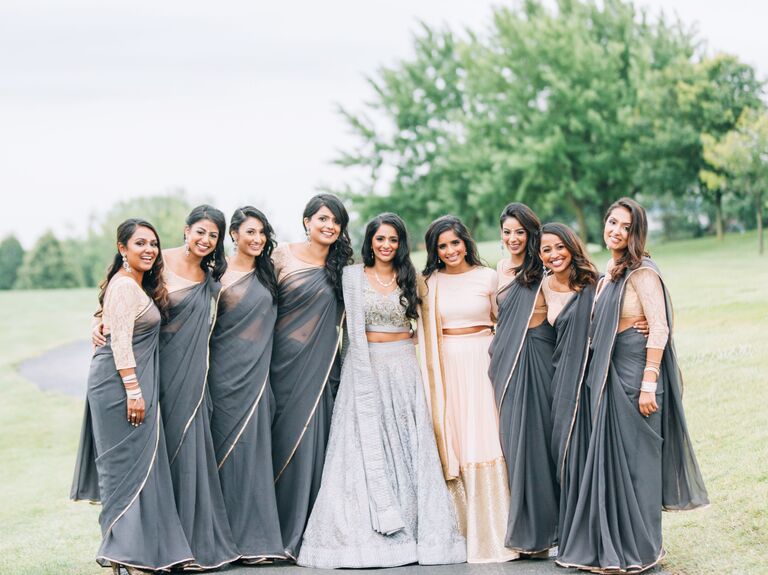
Bridesmaids in Gray Indian Wedding Sarees
To complement the bride's silver lehenga, a stitched ankle-length skirt, the bridesmaids wore steel gray sarees with light pink cholis. A choli is a fitted blouse that's commonly cut at the midriff area and worn with sarees and lehengas.
Red, White and Gold Bridesmaid Saris
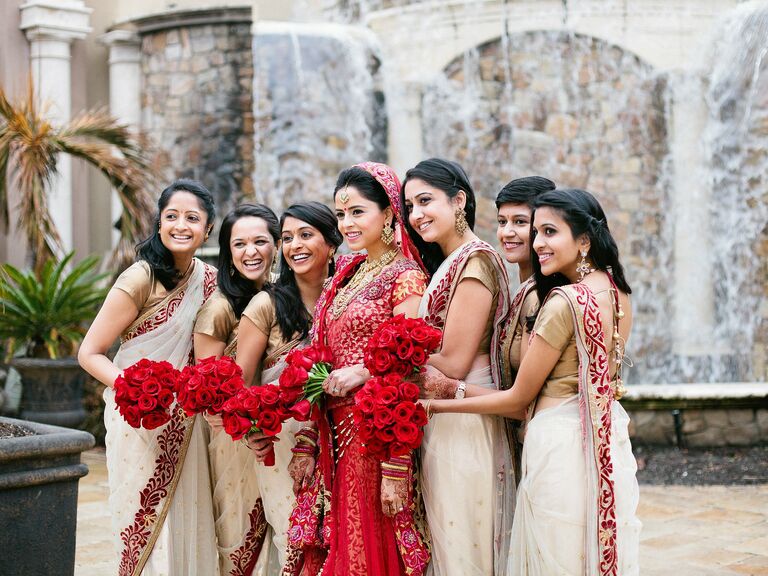
At this glamorous Indian wedding, the bridesmaids wore gold, red and white saris with the same pattern as the bride's choli. The red rose bouquets go great with the bride's and bridesmaids' wedding day attire.
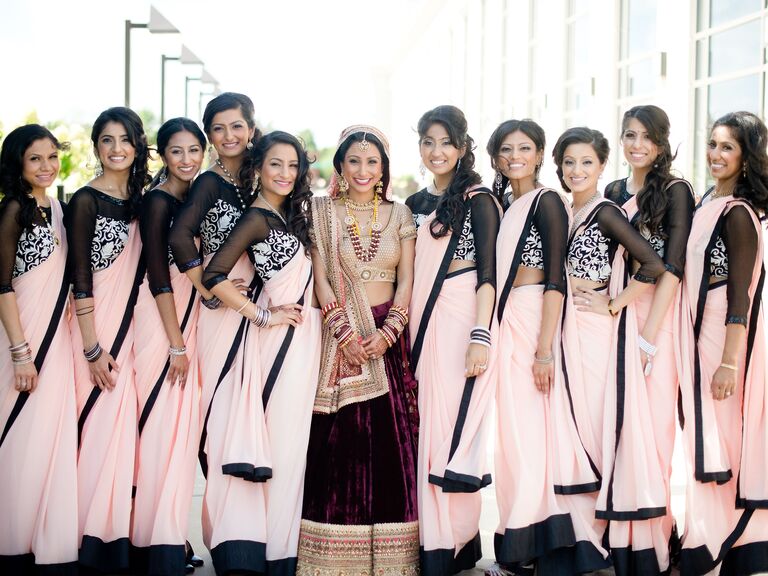
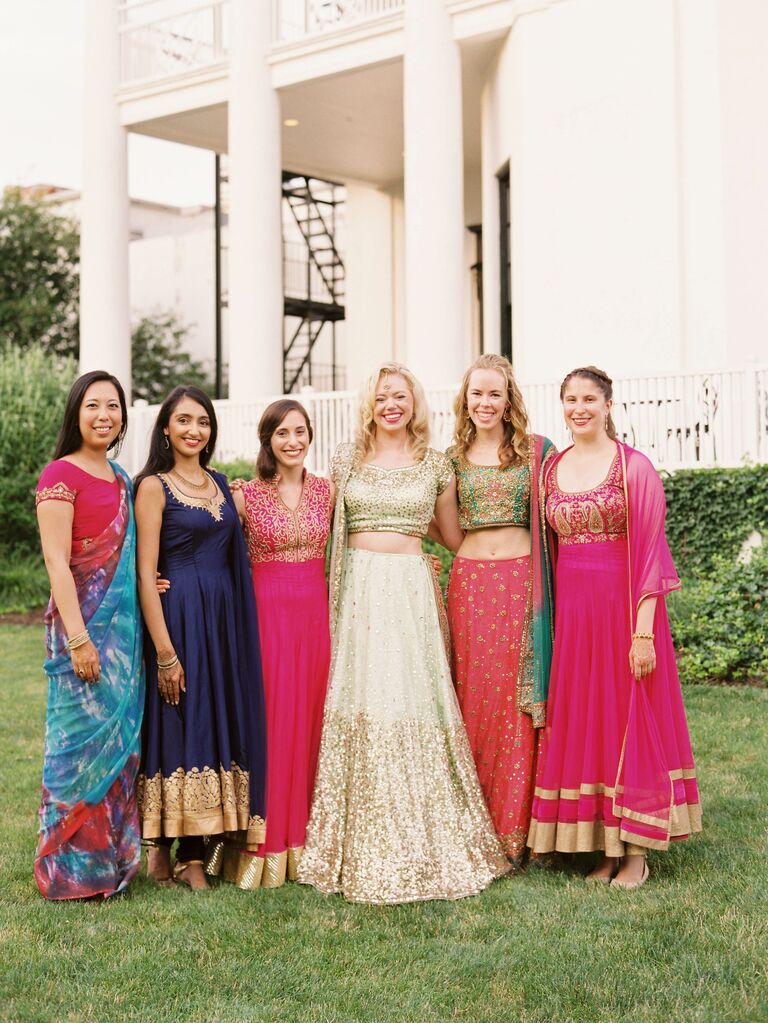
Custom-Made Blush Pink and Black Bridesmaid Sarees
While on a trip to India, the bride custom-designed her bridesmaids' sarees. They were made from an airy chiffon fabric that allowed the women to move around easily. The sheer black top, blush pink saree and floral pattern embroidery fit the bride's modern and romantic-themed wedding.
Bridal Party in Green and Gold Sarees
The bridesmaids donned different gold and green sarees for this bohemian Hindu wedding, which makes for a distinctive wedding party photo. If you feel casual about your bridal party's attire, we suggest telling your bridesmaids a general color scheme and allowing them to choose their saree. This gives them the chance to find one that's the most flattering and comfortable for them.
Unique Tie-Dye Bridesmaid Saree
We love each bridesmaid's colorful Indian wedding outfit, but the tie-dye saree is something we've never seen before. It's a beautiful and eccentric piece that's modern while still honoring traditional Indian wedding culture.
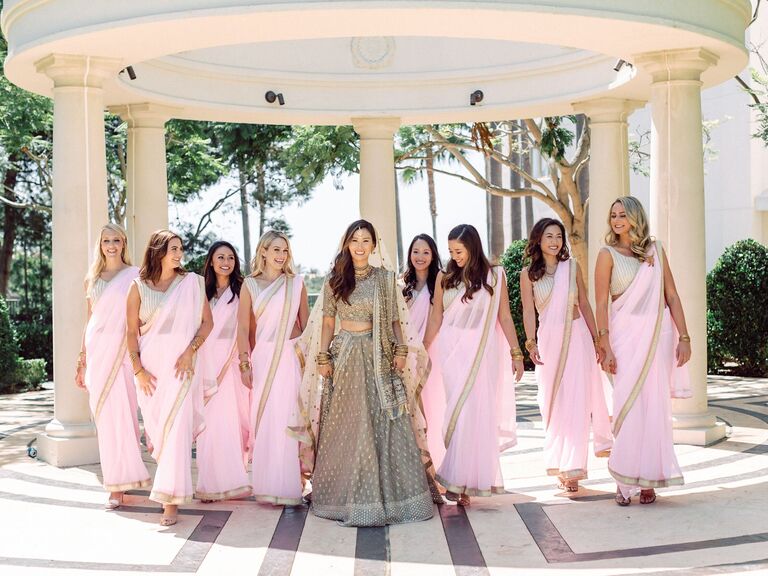
Soft Pink Bridesmaid Saris
Don't be afraid of thinking out of the box for your bridesmaids' wedding sari look. This bride took her bridesmaids' saris to the next level by having them sport sheer pink saris with gold detailing that matched her wedding attire.
Bridesmaids in Traditional Red and Gold Sarees
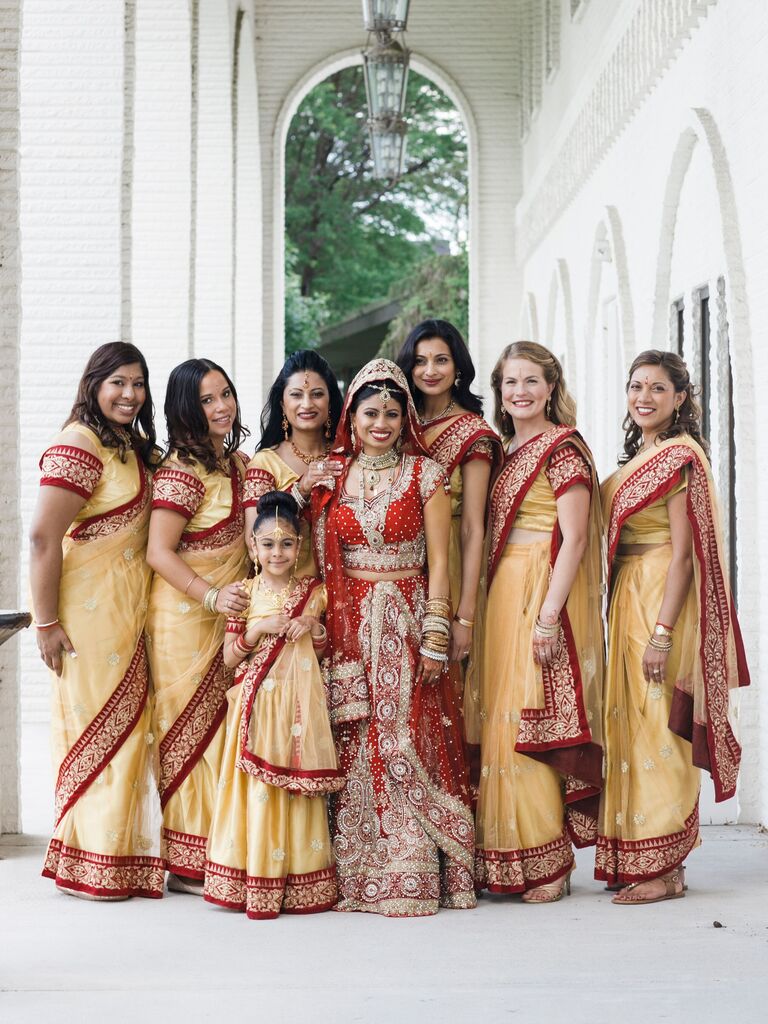
Photo: Lace│Hanky Photography, LLC
,Frontier Heritage
,Utsav Fashion
Don't forget to accent the bridesmaids' sarees with bangles, earrings and necklaces. After getting the bridesmaids' red and gold sarees from India, the bride handpicked gold jewelry sets for each bridesmaid.
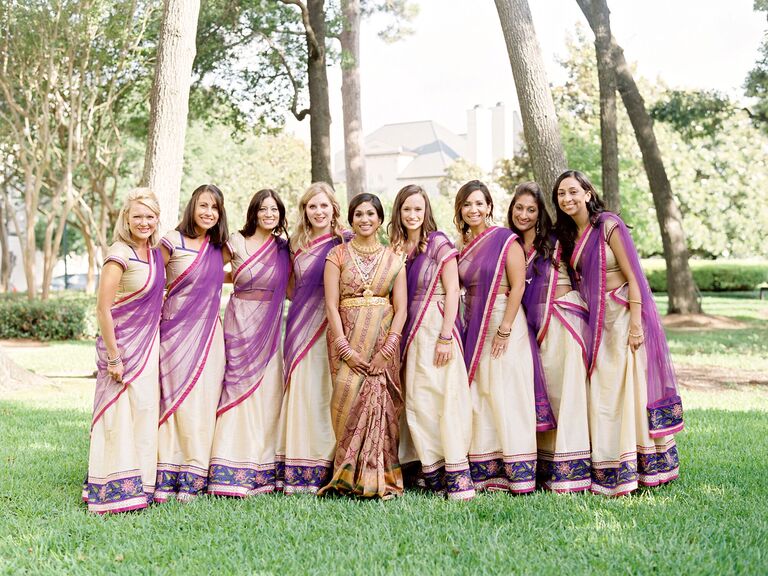
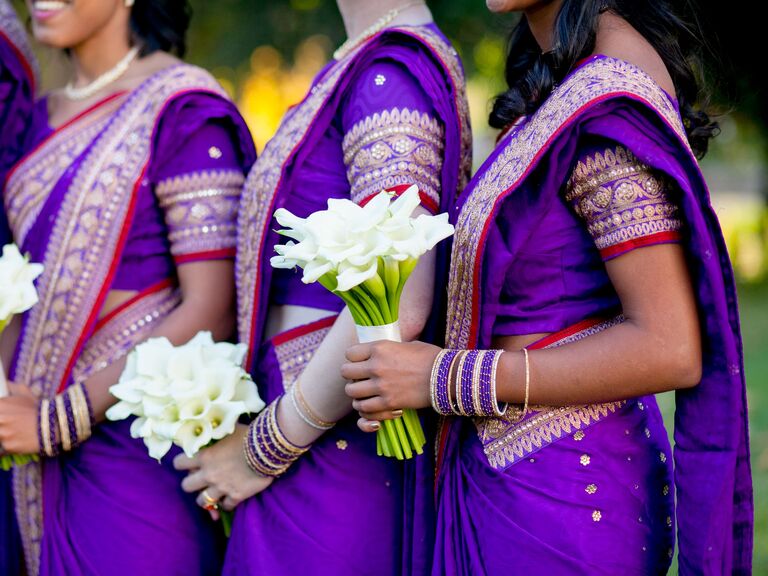
Rich Purple Bridesmaid Wedding Saris
The color scheme for this wedding was purple and gold, inspired by India's national bird, the peacock. So having the bridesmaids dressed in purple and gold saris made perfect sense for the occasion.
Navy Blue and Gold Bridesmaid Saris With Pink Highlights
The couple used their wedding venue's tone of refinement and timelessness to create a classic color scheme of ivory, gold, navy blue and pink. These colors were incorporated into the bridesmaids' saris, the wedding cake decorations, escort cards and much more.
Frequently Asked Questions About Wedding Saris
If you're new to the world of Indian wedding traditions and attire, there's no need to worry. We've answered some of the most frequently asked questions about wedding saris below.
What is a sari?
A sari is a garment made of unstitched fabric, most commonly made from cotton (polyester and silk are increasingly becoming more popular sari constructions). Traditionally, the sari is worn in India, Sri Lanka, Pakistan, Bangladesh and Nepal. Some women receive their sari as an heirloom that's been passed down from generation to generation or purchase one for everyday wear. This piece of cloth ranges from 3.5 to 9 yards in length and can be draped in hundreds of different styles.
A sari isn't the same as a dupatta, which is a shawl or veil worn by women to cover their heads and shoulders.
What's the difference between a sari and a saree?
There's no difference between a sari and a saree. 'Saree' is simply a spelling variation of 'sari,' which means you can use the words interchangeably.
Do sari designs vary by region?
Yes, the types of wedding saris vary by region based on the context, geography and function. For example, the Gadwal sari is a type of sari that originated in southern India and is identified by its unique weaving technique. Depending on their origin, saris from different regions and countries may feature various patterns, embroidery details, draping styles, color schemes and fabrics.


